Blog # 18 - More Component Symbols - (4 of 8 in the Series) Electrical Wiring Diagrams

More Electrical Component Symbols

A transformer is made up of multiple inductors, with the coil turns interspersed, or wownd around different parts of a single core. The symbol for a basic air-core transformer looks like this. Two air-core coils drawn back-to-back. A transformer has the ability to transfer AC energy from one circuit to another at the same frequency. Because transformers are made by combining inductors, the schematic symbols are similar. 

Here we see some transformers that contain iron cores. The ones at A and B have solid or laminated cores, the ones at C and D have powdered cores.

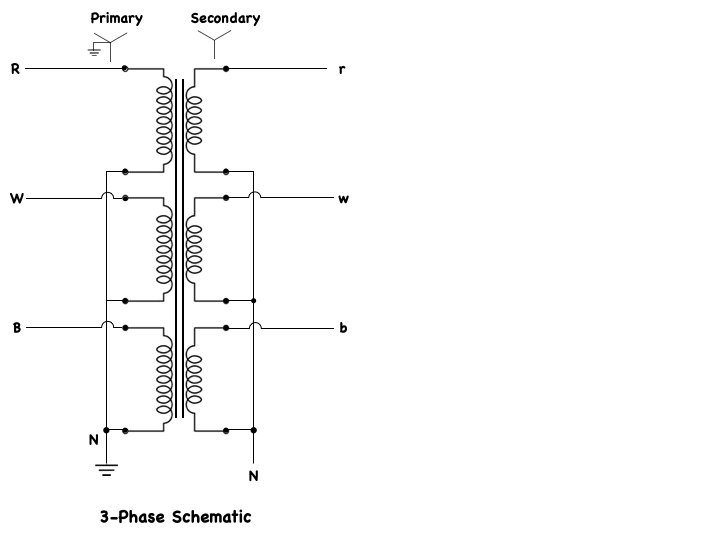
Most electrical power, when produced at power plants, is produced as three-phase AC voltage. Electrical power is also transmitted in the form of three-phase voltage, over long-distance power-transmission lines.

At its destination, three-phase voltage can be changed into three separate single-phase voltages for distribution into the residential areas. Although single-phase systems are used mainly for residential power distribution systems, there are some industrial and commercial applications of single-phase systems. Single-phase power distribution usually originates from three-phase power lines, so electrical power systems are capable of supplying both three-phase and single-phase loads from the same power lines. This 3-Phase schematic shows a typical power distribution system from the power station, or (source) to the various single-phase and three-phase loads that are connected to the system.

The above drawing shows a single-phase power distribution system, at (A) is a Single-phase, two-wire system, at (B) is a Single-phase, three-wire system (taken from two hotlines) and at (C) is a Single-phase, three-wire system (taken from one hot line and one grounded neutral).

Single-phase systems can be of two major types. a single-phase two-wire system, which is shown in “A”, (the top diagram), or a single-phase, three-wire system, which is shown in “B” and “C”, (the middle and bottom diagrams). These systems shown here us 10 KVA, 20 KVA, and 30 KVA transformers whose secondary produces single-phase voltages, such as 120 and 240 volts.

In early residential distribution systems, single-phase two-wire system were the type most used to provide 120-volt service. However, as appliance power requirements increased, the need for a dual-voltage system was evident.

To meet the demand for more residential power, the single-phase three-wire system is now used. A home service entrance can be supplied with 120 240-volt energy by the methods shown in “B”, and “C”, (the center and bottom diagrams). Each of these systems is derived from a three-phase power line. The single-phase three-wire system has two hotlines and a neutral line. The hotlines, whose insulation is usually black and red, are connected to the outer terminals of the transformer secondary windings. The neutral line (the white insulated wire) is connected to the center tap of the distribution transformer. Thus, from neutral to either hotline, is 120 volts that may be obtained and used mainly for lighting and low-power requirements.

All of the aforementioned information is given in this one concise three phase schematic drawing.

Three phases, and transformers…You'll notice that I did not write “Three Phase Transformers” because transformers are not inherently three phase in themselves, but it is how they react when connected to the system.

In order to verify what I just said, let's start with just one transformer. We will call it a single-phase transformer. Now let's draw two more transformers. So far what we have are three single transformers, independent of each other.

Sometimes, it is more efficient to have these three transformers, on the same core which is usually indicated as you see here. This does not change the fact that we still have three transformers that until we make connections to them, are still independent of each other. I am not going to go into any further detail on the makeup or construction of transformers, because that is another course. What we are interested in here is how to interpret them on an electrical drawing.

Transformers serve many functions, however, let's just stick to their ability to step the voltage up or down, depending on where it is in the system. So we designate the primary and secondary's of transformers according to where the power is being delivered from. Power is always delivered to the primary side of the transformer, and it is always delivered from the secondary of the transformer.

I am now going to connect the bottom side of each winding on the primary side of the transformer, ground that connection, and designate it as neutral or N. The top side of the winding I'm going to connect to a balanced three-phase power system, that is designated, “R,” Red, “W,” White, and “B,” Blue. This is known as a “Y” connection and is designated as such on drawings and nameplate data as shown here. The fact that the neutral is grounded is indicated with a grounding symbol coming from the center point of the Y. What you see here is exactly what you would find on a three-phase schematic drawing, although the secondary connections haven't been shown, I will deal with that shortly. A very important point to note here is that we are dealing with AC voltages on the primary. Even though we are connected to a three-phase source each of the transformers is only going to see one AC voltage and will handle it as such. This means it will either step that voltage up or down, but it will be in phase with that one voltage. Because it is a balanced system, the voltages are equal in magnitude and 120° apart… which I have indicated with the colored vectors or phasors However, because we have connected the bottoms of the primary windings together, the phasor tails form a neutral. This means we can move the phasors anywhere on our two-dimensional plane, however, their tails are pinned. Meaning, if you move one phase, all the rest of them have to move likewise.

This time let's connect the bottom of one primary winding to the top of another primary winding, like this…and carry on connecting the bottom of one winding to the top of another and the bottom of that winding to the last open top. Now Let's bring the top of each winding out, and connect them to our balanced three-phase power system that is designated, “R”, Red, “W”, White, and “B”, Blue. The voltage phasors this time are phase to phase, rather than Phase to neutral. So there is a 30-degree phase shift, but they are still 120 degrees apart. This connection is called a delta connection and is indicated by the greek letter delta which looks like a triangle. It is called delta connected because the relative phasor positions are ”pinned” and form a delta.  However, because we have connected the terminals of the primary windings together, we can move the phasors anywhere on our two-dimensional picture, however, they are pinned. Meaning, if you move one phase, all the rest of them have to move likewise.

Now let’s look at the secondary side of the transformer and how it can be connected. Let's start with a grounded-Y connection on the primary and let's connect the bottom side of all the windings on the secondary side. In other words, make an ungrounded Y connection. Take note that the voltage across the winding on the secondary side are always in phase with the voltage on the primary side winding of each transformer. This is because they are magnetically linked to each other. I'm going to bring out the top terminals of each secondary winding and designate them (lowercase), r, w, and b Indicating it as red white, and blue but on the secondary side of the transformer. So I've labeled them lowercase rbw. This is symbolized as a Y (ungrounded) as you see here. 

The the voltage vectors, both primary and secondary, form a “Y” with the tails of the vector or phasor arrows pinned at the neutral.

There are several ways of drawing the single-line schematic for this arrangement. One is drawn with two circles and the Y - Y configurations inside the circle. The ground is indicated as you see here.

Another way of drawing the single-line schematic is with stylized coils indicating the primary and secondary winding along with parallel lines between them, indicating the core. With this will be an indication of the primary and secondary connections. In this case, a grounded Y and an ungrounded Y.

A third but less popular form is the primary and secondary being indicated with the zig-zag line. Again with this will be an indication of the primary and secondary connections. In this case a grounded Y and an ungrounded Y.

Other information may also be found alongside the transformer symbol. In this case, the KVA rating and the primary and secondary voltages. Also, in this case, the percent impedance of the transformer is indicated…5.75%.

You will notice that the secondary voltage is given Line-to-Line as well as Line to Neutral (480 and 277). This is not always the case though. In three-phase systems, Only Line to Line voltage is given. If there is a line to neutral voltage available it can be calculated. Therefore this transformer ratio is 13.8 kV to 480 Volts, and is Star-Star Connected.

Let's return to the Delta-connected primary and let's connect the secondary in Delta as well. The top of each winding is brought out to be the red, white, and blue terminal of the secondary side of the transformer. Remember that the primary side of the transformer is connected to the phase-to-phase voltages of the system. For the top transformers let's indicate the phase-to-phase voltage with a red vector or phasor arrow. Since the primary winding is magnetically linked to the secondary winding. The secondary voltage in that winding will be in phase with the primary winding voltage. The same is true for each of the transformer windings. When we plot the vectors of the primary and secondary sides of the transformer, they look like…the above.

The single line schematic drawing, therefore, relates to this connection and will look like this… notice that there is no neutral on either side of the transformer, hence, no way of grounding this transformer other than its casing. The single-line schematic may also be drawn like this. The important part is the delta indication for both the primary and the secondary.

Less common you may find a single line schematic for the transformer looking like this. Again the important part is the delta indication for both primary and secondary. Other information may also be found alongside the transformer symbol. In this case the KVA rating and the primary and secondary voltages. Also in this case the percent impedance of the transformer is indicated…5.75%.

You will notice that the secondary voltage is given Line-to-Line as well as Line-to-Neutral (480 & 277). This is not always the case though. the standard for three phase systems is to state the voltage as Line-to-Line voltage. If there is a line to neutral voltage available it can be calculated. Therefore this transformer ratio is 13.8 kV to 480 Volts and is Delta-Delta Connected.

Let's leave the secondary connected as Delta…Let's reconnect the primary in grounded Y. The primary is now connected again to a balanced three-phase system, red, white, and blue. Remember that each of the transformer’s secondary windings is magnetically linked to the primary, therefore, the open circuit secondary voltages are in phase with the primary voltages. As before, the primary voltage phasors are connected together and form a neutral, like this. And as before, the secondary voltages are connected together in such a way as to form a delta. The secondary winding of the primary, red to neutral winding, is connected between the red and white phase of the secondary, and because it is in phase with the primary red to neutral voltage, it will look like the above, and we can label it as secondary phase to phase (red to white) voltage.

The secondary winding of the middle transformer is connected between the white and blue phase of the secondary. Because this winding is in phase with the primary white-to-neutral voltage, it will look like the above, and we can label it as the phase to phase, (white to blue) voltage.

The secondary winding of the bottom transformer is connected between the blue and red phase of the secondary, and because it is in phase with the blue-to-neutral voltage of the primary, it will look like the above, and we can label it as phase-to-phase (blue to red) voltage.

Looking at the two sets of phasors, we see that the primary phasors are line-to-neutral voltages while the secondaries are phase-to-phase voltages. However, we can plot the primary phase-to-phase voltages…and compare them to the secondary's…looking at just the red-to-white voltages. (the rest will be similar). we see that the primary phase-to-phase voltage will lead the secondary phase-to-phase voltages by 30°.

It should be no surprise that the single-line schematic will look like the above, the info block would look something like you see in the above, showing the KVA rating, the line-to-line voltages for both the primary and secondary, and the transformer impedance of 5.75%. This is known as a Star-Delta (or  Y–delta) configuration or connection.

Now let's look at a transformer with a dual secondary. There is one primary winding linked magnetically to two secondary windings. Because we are dealing with a three-phase system, we have to consider three of these transformers and they could be all wound on the same core, (although that is not necessary. they could be three individual transformers not wound on the same core), making them a transformer bank. In order to keep track of the connections, let's number the secondary windings of each transformer 1 and 2.

Let's connect the primary windings in a grounded Y configuration and connect them to a balanced three-phase system,  (Red, White, and Blue).

Let's connect the number 2 winding of each transformer secondary in the same (Y configuration), except not grounding the neutral. We will call the secondary connections r2, w2, & b2, all lowercase.

Next, we connect the number 1 winding of each transformer secondary in a delta configuration. We will call the secondary connections r1, w1, & b1, all lowercase. The two secondary winding connections are designated Y and Delta. Because of the Y connection and the fact that they are connected to a balanced three-phase system, the primary phase to neutral voltages will be equal in magnitude, but 120° apart. Also because the transformer primaries are magnetically linked to each of the two secondaries, the secondary voltages will be in phase with their primary counterparts. The phasors are shown above.

The single-line schematic(s) are shown above. The info block might look something like what is shown above. the KVA rating, the line-to-line voltages for both the primary and the two secondary voltages, and the transformer impedance of 5.75%.

This is known as a Star-Star Delta (or  Y – Y delta) configuration or connection.

This double secondary winding transformer can also be connected in what is known as a zig-zag pattern, giving us a Star–Zig–Zag (or Y - Y-Zig-Zag) transformer. In this example, the primary is connected in a Y configuration and fed from a balanced three-phase system, red, white, and blue. As before the secondary winding voltages, are in phase with the primary side winding voltages. The number 2 secondary windings are connected in a Y configuration. As before, the phasors of the secondary voltages are pinned or joined together, giving the familiar Y pattern. Now, I am joining the top of the red phase number 2 winding to the bottom of the blue phase number 1 winding, then bringing out the top of that winding and designating it lowercase b. That is the same as connecting the head of the red phasor arrow to the tail of the negative blue phasor arrow.

Next, I am joining the top of the green phase number 2 winding to the bottom of the red phase number 1 winding, then bringing out the top of that winding and designating it lowercase r. That is the same as connecting the head of the green phasor arrow to the tail of the negative red phasor arrow.

Lastly, I am joining the top of the blue phase number 2 winding to the bottom of the green phase number 1 winding, then bringing out the top of that winding and designating it lowercase w. That is the same as connecting the head of the blue phasor arrow to the tail of the negative green phasor arrow.

This type of transformer, a star zig-zag, is extremely useful when connecting to a system where you want the secondary voltage to be in a delta formation but not shifted from the primary voltage. Normally, a star-delta transformer shifts the secondary quantities by 30°.

The single-line schematics are sown above. The info block might look something like what is shown above. The KVA rating, the line-to-line voltages for both the primary and the secondary voltages.

This is known as a Star-zig-zag (or  Y–zig-zag) configuration or connection.

This is a sample of a fictitious transformer station, “Spruce TS”, which has four major transformers connected to its low-voltage ring bus. T1 and T2, are Y-delta transformers. T3 is a Y-zig-zag transformer, which makes available a four-wire secondary on the ring bus, that can now feed out the Y-Y transformer T4.

This is another example of several power transformers in a system, that are paralleled together. You can see the various voltage levels designated at each bus. The voltages range from 400 KV to 400 Volts.

This is the third example of a single-line schematic, featuring several types of transformers along with some dialogue as to what they were being used for. For example, there are four sets of current transformers, (one for each phase) and two sets of Star Connected potential transformers. T1 is a Zig-Zag Star Connected 500 KVA, 33 KV to 400 Volt power transformer with an impedance of 4.25%